Why Does It Take Too Long to Upload Processor Image Rslogix500
RSLogix 500: Creating jobs for SLC 500 or MicroLogix
How to save to a SLC 500 or a MicroLogix in versiondog:
- Start the AdminClient and open the Jobs module.
- In the Project tree, select the RSLogix500 component.
- In the carte du jour tab, click on Create or drag & drop the components into the Jobs section.
- Check in the section Job configuration, if the upload blazon RSLogix 500 is being displayed.
- Brand sure the desired settings are in place for the following sections: General, Notification, Upload and compare, Create a version automatically afterward job run. The Notification and Create a version automatically after job run sections are only displayed if the necessary settings take been implemented. For more than data on configuring the general sections, see Jobs in the tutorial AdminClient.
- Configure the settings in the RSLogix 500 settings section
- The RSLogix 500 project's RSS file should have been automatically selected. This is located under Project. If this is not the example, select this file from the drop-downward list.
- In Communications path, enter the gateway information. The way to do this is dependant on the software that you are using (RSLinx or Manufacturing plant Talk Linx):
- Open the FactoryTalk Linx Browser tool and correct click on the project. This volition in plow open the project's configuration.
- Hither, copy the path of the device path. This can exist, for example, RSLinx Enterprise!Ethernet\10.0.220.145. (The RSLinx Enterprise! part of the path is optional.)
- Enter the path into the communications path field. This is located in the job configuration.
- In order to select the path to the PLC, click on Search in Communications path.
- Communications path will open up. Select the PLC of the job that y'all want to salve.
- Click on salvage and exam the job by clicking on Execute selected jobs one time.
- Enter the path to the PLC manually. The path tin exist found in RSLinx. The path has the post-obit format: xxx!yyy.
- xxx is the name of the computer running RSLinx Classic.
- yyy is the name of the configuration for the PLC in RSLinx Classic.
- Practise not forget the Separator !between both parts of the path.
- Open RSLogix 500.
- Double click on Controller backdrop in the projection tree.
- Open Controller communications.
- Copy the text Comms path.
- Enter the text into the section access path. This is located in the task configuration in the AdminClient.
- If the project is countersign protected, enter the necessary password in the Controller Countersign section.
- By clicking on Warn when forced values are agile, you can make up one's mind if you want to accept a warning displayed when forced values are active in your project.
- Click on relieve and test the job by clicking on Execute selected jobs in one case.

Image: Job Configuration, RSLogix 500 Settings department
If you updated RSLogix Enterprise Edition via FactoryTalk Linx, you will demand to enter the communications path manually:
Go on as follows:
If y'all are using RSLinx Archetype and are using it on the same automobile every bit your versiondog server,
Go on equally follows:
If yous are using RSLinx Archetype and are not using information technology on the same car every bit your versiondog server:
Proceed as follows:
OR
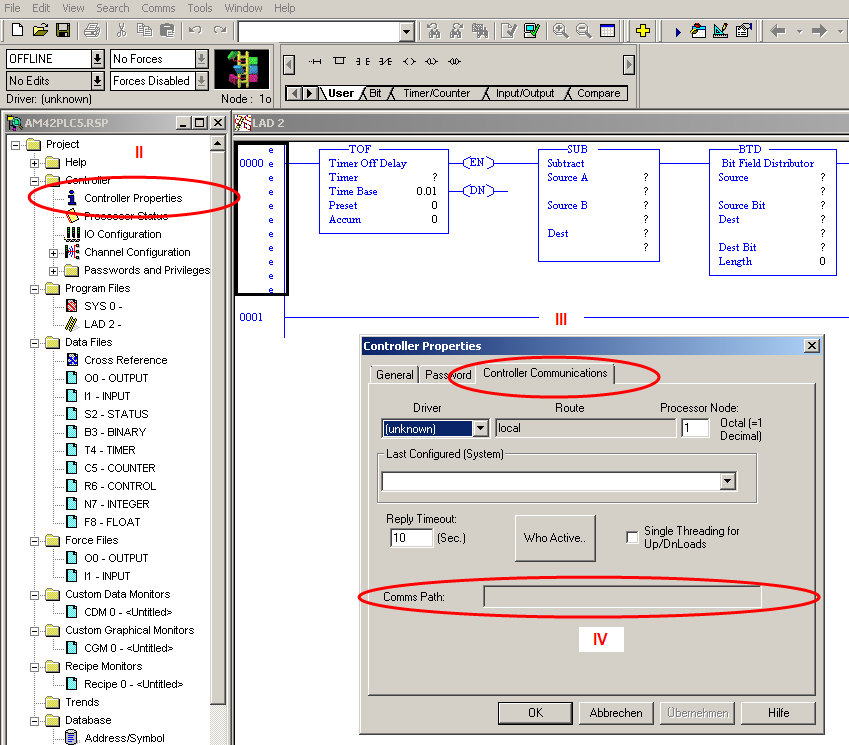
Image: RSLogix 500 Editor, Dialog Controller Properties
 To be able to process password protected projects, the editor needs to exist opened in English.
A displayed warning tin can be useful. This tin, for instance, be useful when using manual command at your facilities and there is the run a risk that the forced values could exist overseen.
The job result (Backup) tin can be used for a detailed comparison, a disaster recovery and further processing.
Configuring a timeout
When uploading big amounts of data, a timeout may occur despite the default time being preset at 30 minutes. This timeout can be adjusted globally for all upload types or for each upload type separately. To adjust the maximum time for chore execution according to the upload type, go on as follows:
- Starting time the AdminClient and open up the Jobs module.
- In the menu, click on Global job settings.
- The Upload specific configuration window will then open.
- Select the upload blazon in the navigation bar on the left.
- Select the Use specific timeout for this upload type checkbox.
- In the Maximum time for job execution field, enter the time period in minutes. The maximum possible value is 540 minutes.
If you practice not select the Use specific timeout for this upload type checkbox, the next time you modify the global timeout, the value set hither will be overwritten past the global i.
Alternatively, you lot can adjust the timeout via the INI file Classes.ini . (Go to the path in the server or amanuensis archive:..\VD$A\Configuration\Upload\Classes.ini). For more data, see the INI files department, located in the AdminClient tutorial.
The value entered in the Upload type specific configuration window will then be copied into the INI file.
| FAQ: Why does the upload freeze when I upload a password protected RSLogix 500 project? versiondog remotely steers the editor when uploading a project and enters the password when required. It may be necessary to run versiondog nether the organization account and with the option Allow data exchange betwixt service and desktop(user interactivity) activated. Continue as follows:
Epitome: Properties of <service>, Login tab |

jenningswhintaked.blogspot.com
Source: https://www.my.versiondog.com/tl_files/versiondog_info/en/content/tutorials/rslogix_500/rs_logix_500_1050.htm
0 Response to "Why Does It Take Too Long to Upload Processor Image Rslogix500"
Post a Comment